There is such a great variety of drawing materials on the market that one feels a little inundated when it comes to choosing what is right for you. Speaking to artists does not help either. Some swear by their pencils whilst others will not hear of anything other than charcoal. So where do you start?
Regardless of where you start, once the bug has bitten you, you will probably end up with a drawing box that looks similar to the one that I travel with. It contains everything I might perhaps want to use and I usually end up not using even half of it, because there is too much to see and do. I take thousands of photographs with every intention to ‘some day’ turning them into works of art. Regardless, I have done some of my best work whilst traveling and the drawing box tags along.

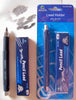
There are times when it is not convenient to take a huge box like this along. Those are the times when you can only take a single pencil and a small notebook in your pocket. On these occasions I take one of my absolute favourite pencils of all time. This is Marie’s jumbo clutch pencil. It is filled with a 4B lead which is 5,6 mm in diameter. This means that although you have a very soft lead, its thickness ensures that is tough enough to withstand hard shocks and bumps. It also retracts very neatly and its clutch pencil casing keeps it safe from harm. The quality of the lead is also a dream to work with. You will see from the photograph that it allows total control over the intensity of the line by simply reducing the pressure applied to the paper. Whilst all pencils will do this, I find that this one is particularly responsive and very easy to work with. You get surprisingly fine lines from what appears to be a blunt point and you have the added advantage that you can taper one point to a chisel point, whilst leaving the other end fine. Simply slide the lead out, turn it around and you have two different points in one pencil. At first glance the pencil appears to be overpriced until you realize that it comes packaged with 6 extra leads. That is when it dawns on you that you could hardly get better value for your money.
Recently someone asked me which pencils I thought were the best to buy. This is a difficult question for me to answer. Personally, I prefer to have a variety of pencils at hand. I’ll review a couple of the more easily available ones on the market today so that you can review their strengths and weaknesses for yourself.
Before I start, I would like to quickly explain the grading on pencils. The most commonly used lead is HB. HB stands for Hard Black. This is the lead (actually graphite) in the middle of the grading scale. The higher the H value of the pencil, the harder the lead/graphite is, with 9H being the hardest. The harder the graphite is, the fewer residues it leaves on the paper when you use it, causing the lines and markings to appear lighter, rather than darker. Your Hard range stretches from H to 9H with F in between H and HB. The softer the graphite is the more residues it leaves on the page and the darker, or blacker, your lines and markings appear. This soft range is called the Black, or B range, and stretches from B to 9B, with 9B being the softest on the grade.
The harder the graphite, the longer the pencil tends to last, because it leaves less of itself on the paper and doesn’t go blunt as quickly as its softer counterparts. The reverse is also true.
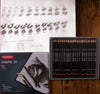
With that out of the way, I want to start with Derwent’s Graphic 24. This set consists of the full range of pencils (20 in all), doubling up on some of the more popular ones, namely 2H, HB, 2B and 4B, giving you a total of 24 pencils encased in a sturdy metal tin which protects the softer cores against bumps that could cause them to break. You only need to look at the photo to realize that Derwent has a wonderful product here which is surpassed by few, if any. If doing a grayscale drawing, you would doubtfully find it necessary to look elsewhere for darker darks or lighter lights. There are plenty of sets on the market that would promise this, but when you compare their 2B and 4B, for example, there is too slight a difference to make it valuable. Being an imported product, Derwent is expensive to buy in South Africa, but if you are looking for quality, look no further.
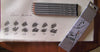
Rolfes is another contender for good quality pencils. You will notice that my set has seen its fair share of work. This is the set that travels with me. Its plastic casing is hard enough to protect the pencils inside, and whilst the pencils are not cheap, they certainly are cheap enough to replace without regret if something were to happen to them. I am too much of a scrooge to feel the same way about my Derwent pencils and wouldn’t risk them even if their tin case is of much sturdier stuff. I suppose you have to ask yourself at this point whether travelling with your pencils is a priority for you or not. If you plan to work out of doors or away from home, look for something in a sturdy box. Pencils move around too much in a normal pencil cases and it is bothersome to keep on looking for the right pencil when they are all a jumble.

Another set of really good pencils is produced by Staedtler. The set in the picture is certainly limited but will take the beginner a long way before they start feeling the need to expand their collection of pencils. It contains all of the most frequently used pencils and comes handy with a sharpener and eraser, both of which are really good. A word on the side about erasers and sharpeners: you will want to invest in a variety of both. Some erasers work brilliantly for some things, whilst others are better suited for other tasks and mediums. I will write something on this in the future, but for now, I’ll leave you with the idea of collecting erasers. Be careful of brightly coloured ones since these sometimes leave their colour on the surface you’re working on. Equally, you will want to collect a variety of sharpeners. It is true that you will find one sharpener that will sharpen most of your pencils, but it is also true that you will come across a pencil, or set of pencils, that will simply keep on breaking, or even splitting, in this trusted sharpener. Try some more sharpeners before you write the pencil(s) off altogether. Hint: the most expensive sharpeners are not necessarily the best. Hint 2: Some pencils prefer cheap plastic sharpeners.

For those who are on a tight budget, do not despair. There are plenty of good quality products available. One of these inexpensive sets is Marco’s Raffine. Once again it has only the 6 most popular pencils. I had my doubts about this set, because I have seldom come across good quality at low prices. I was pleasantly surprised. When parents approach me about buying pencils for their children who are showing an interest in pursuing art, I advise them to buy this set. I believe that you have to learn art with quality products and this set is an excellent starting set. To tell the truth, I am so impressed with it, that I got myself one as well.
Another set that I am impressed with is one by Daler Rowney, called Simply. I received this as part of a gift from someone and was overjoyed, as I always am when receiving art materials. Aside from the fact that the graphite is of good quality and that the set consists of the 4 most popular pencils (if I had to reduce it to even less than 6), I loved the shape on these. They are angular. This means that they won’t roll off the work surface, land on the floor and shatter their core in the process. Brilliant! For someone like myself, who often work on a sloped surface, this is a definite bonus.

Not all pencils, that are worth having, come in sets. Cretacolor has a Sepia pencil that adds another dimension to monochrome drawing. Use it on its own or combine it with your gray-scale drawings to add interest and a bit of nostalgia.
Faber Castell has some oil base pencils which come in darker and lighter shades, as well as Sanguine. Oil based pencils are very smooth to use and an absolute pleasure to work with. However, it might affect things if you want to use non-oil based pencils over it, or blend the two types. They will probably be resistant to the process. Be aware of this and work within the constraints and you will find that these pencils add to the possibilities and variety of your work.
Derwent has two pencils which they call Onyx. This is supposed to be the darkest black you can find. I disagree. They are rather grey in comparison to Derwent’s higher B range. This left me with an initial disappointment over these two pencils. However, I soon figured out where they fit into my scheme of things and could not remain disappointed for long, because, being Derwent, I had to once again be impressed by the quality of the products.

Once you have been drawing for a while, you will find that the point on your pencil starts to frustrate you. You will want it to be longer, shorter, sharper, more chiseled, etc. This is when you start to realize that a normal sharpener does not fulfill your needs any longer. Invest in a craft knife to sharpen your pencils with. This allows you greater freedom in shaping your points. This is also the point where you realize that you want a differently shaped core in your pencils. There are a number of options on the market and I will discuss a few of these.
The first is the Ergosoft pencil by Staedtler. It is triangular in shape with a thicker core. This allows you greater freedom in shaping the point to suit your needs and requirements.

In the same vein, you also get the Triograph pencils by Koh-I-Noor. These are available in 2B, 4B and 6B. When I bought these, I was unfamiliar with the brand, but desperate enough to try anything. I was so impressed that I went back the next day and bought myself a second set, in case they weren’t around when mine reached the end of their lives. I believe that says it all as far as quality is concerned. Again, they are triangular with a thicker core.

Having gained trust in Koh-I-Noor, I did not hesitate to buy these flat pencils when they appeared on the market either. Again they come in 2B, 4B and 6B. These have exceptionally wide flat cores that can truly sharpen and shape to a chiseled end.

In the same line as the pencils above, are the commonly used Carpenter Pencils by Rolfes. They are available in Hard and Medium and are brilliant for achieving the same results as the Koh-I-Noor flats discussed above. The only difference is that these have hard cores and will leave a lighter mark. Affordable and available from your local hardware shop, they are easy to add to your collection in the interest of variety and fluidity.

***
No discussion on drawing materials would be complete if restricted to pencils alone. A very necessary next step is to move on to charcoal. These days charcoal is available in a variety of options. You get them in compacted bars, as is illustrated in the photo below. On the left we have Daler Rowney’s charcoal bars in medium and soft. Soft will be darker and Hard will be lighter. Derwent, pictured next, prefers to mark theirs as Light, Medium and Dark. Traditional charcoal is still widely available in different thicknesses. Pictured is vine charcoal in fine and medium thicknesses. Lastly, I have placed a selection of tinted charcoal bars in black, grey, sanguine and sepia.

Charcoal can be very messy to work with. It is this property of charcoal that has lead to the development of charcoal pencils. Once again there are a number of options available. Rolfes has a set of three in Hard, Medium and Soft. These are sticks with a plastic coating around them. The coating comes off without too much trouble and breaking off one end allows for a whole different range of marks to be made.

Derwent has its own version of charcoal pencils, but here the charcoal comes encased in wood. The set consists of Light, Medium and Dark, with White added to the mix. The white isn’t actually charcoal, but has the same consistency. The white can be used with great success on coloured backgrounds, the darker the more clearly visible, with black paper topping the list of options. However the white can be used with equal success as a blender as shown in the photo. Here the sepia pencil and the charcoal pencil were not laid down on top of each other, but rather next to each other. The white pencil was then used to blend the two together where they met in the middle.

The sepia pencil in the photo above is one which is produced by Cretacolor and though not charcoal, blends very well with it.

If colour is what you are looking for in charcoal, then Derwent is once again to the rescue. They produce a set of 24 tinted charcoal colours, which include the four of the set mentioned above, namely Light, Medium, Dark and White.

Besides these 4 colours you also get the colours in the photo below. The colours are muted and very subtle, only barely moving your drawing away from being monochrome. The colours mix very well which allows for a great variety of colours to emerge from the limited number mentioned on the lid. A further added benefit is charcoal’s ability to be ‘painted’ with water. In the illustration you will see that each colour was painted with water on its right side. Certainly, this is limited, but the experienced artist will know how much can be achieved by that slight ability to create different effects, shades and textures. In the very last example you can see that the colour was actually taken from the pencil and painted onto the paper. Fascinating indeed!

Artists who love to draw rarely want to be bogged down with bottles of water and/or brushes. Pentel comes to the rescue here with its Aquash Brush. The handle of the synthetic brush is a reservoir for water. Give it a slight squeeze and the water emerges form the bristles. No more containers and dozens of brushes! Squeeze a little harder and the brush practically washes itself and you can move on to the next colour.

***
After all is said and done, drawing is about more than just pencils or charcoal. If you really want to excel, you will need a few more tools. You can use just about anything to blend with, and if you make a study of this, you will find that different materials used for blending, can actually give your drawing the impression of different effects and finishes. That is a discussion all its own. For the sake of this discussion, I want to point out a few tools you can buy. In Picture A, no tool was used to blend the two colours which was simply laid one on top of the other. In Picture B, the two colours are laid down next to each other. This was the case for each of the rest of the illustrations in the photo. In Picture C, we used the Blender pencil by Derwent to blend the colours. In Picture D, we used the Burnisher by Derwent. These two are sold as a set. The burnisher will add a bit of shine to the blending process that the blender can not achieve.
In Picture E, we actually used a typewriter eraser to blend with. This eraser is encased in wood and can be sharpened to a fine point. This allows you to draw negatively into laid down colours.
Picture F shows the effect of blending with a paper stump. These come in different sizes for purposes of precision work. The two ‘pencils’ used for blending is shown to the left of the photo.

I do not wish to go into a whole discussion on erasers and the pros and cons of each. I fervently advise that you collect a variety. Having said so, I do want to advocate the use of an eraser shield as well as a typewriter eraser. The combination of these two allows for precision erasing and drawing negatively into your picture.

Another tool I have to mention in conclusion, also deals with negative drawing. If you buy a set of inexpensive embossing tools, you will find it much easier to draw things such as tall grass, hair and fur. You simply draw the invisible indents into your paper and then apply your pencil or charcoal over it. The colour will not enter the grooves and you will be left with beautiful negative lines. Easy as that!

I hope I have given you an idea of what is available and of how much value it can be for your art. Now I can’t wait to get up and draw something. Who is with me?
By Marietjie Uys
No comments:
Post a Comment