Follow these links to the Index Blogs:
Blogs 1-50
Blogs 51-100
Blogs 101-150
Blogs 151-200
Blogs 201-250
Blog 201 - Making a Quilted Patchwork Comforter and Pillowcase Part 3
"We are busy making a quilted patchwork comforter/duvet cover with matching pillowcases. We finished the quilting and patchwork on the pillowcases in the previous blog. Today we continue the process when we start to assemble the comforter.
Here are the links to all of the blogs in the series:
Part 1
Part 2
Part 3
Part 4"

Blog 202 - Painting Proteas on a Runner Part 1
"I have been asked to paint a table runner with Proteas, to match a set of place-mats and coasters. Since the client was thousands of kilometres away, I only had photographs to work from. The challenge was on! Let me show you how I met it."

Blog 203 - Painting Proteas on a Runner Part 2
"In Part 1 of this project we carefully planned and drew the Proteas on the runner. We then started adding color with Acrilpen, outlining the various parts to make the drawings clearer and to add essential shadows. Today we start painting in all earnest."

Blog 204 - Baking Paw-Print Vanilla Cupcakes
"My little nephew wanted a Paw Patrol theme for his birthday cake and his mom and dad figured it would be okay to have cupcakes with paw prints for a cake. I agreed on the cupcakes, but insisted on a central cake as well. I'll tell you more about that in the next blog. Let me show you first how easy it is to make cupcakes with paw prints on them."

Blog 205 - Baking a Grapefruit Cake
"In the previous blog I told you about the Paw Patrol Cake that my nephew wanted for his birthday. I baked a dozen or so vanilla cupcakes and knew that this would not satisfy him since his idea and his parents' idea were two vastly different worlds. I then decided that I would bake him the Paw Patrol Station that he wanted as well. However, I would bake a different flavoured cake to keep it a little more interesting."

Blog 206 - Decorating a Paw Patrol Cake
"In the previous two blogs we have spent a lot of time baking and preparing the cakes that would form the base for Paw Patrol themed party. Today I will show you a little bit about decorating the cake. This is very entry level fondant work that anyone can do."

Blog 207 - Chalk Paint Place Mats
"Chalk Paint is all the rage these days and painters and designers alike love them for the chalky finish that lends itself to distressing and vintage styles. It is about time we did a blog on chalk paints then! In today's blog I am going to paint a set of 4 place mats with chalk paint. These place mats are available from APrettyTalent.com at Miekie Crafts. Click here to purchase these."

Blog 208 - Using Masking Fluid to Paint a Card
"Masking fluid is a wonderful medium that can be painted onto a paint surface to retain the original color of the surface. It dries into a rubbery substance that can simply be rubbed away with a finger once dry. In today's blog I show you an introduction to the medium which has much more to it than can be covered in this single blog. But it is a good place to start. We paint a simple design on a small piece of paper and then turn the tiny painting into a handy card that can be used for a variety of occasions."

Blog 209 - Baking scones in a jiffy
"Who does not love a freshly baked scone? Today I will show you how to bake some of the best scones I have ever tasted. This is a firm favorite and they can be whipped up in minutes, making them ideal to prepare for unexpected guests."

Blog 210 - Chalk Paint & Decoupage Combo Warmer Mats
"I love the mat finish that you get from chalk paint. It makes a lovely background for a variety of products and is brilliant for use on furniture. Today I decorate a set of 4 warmers for the table or sideboard to put the warm pots on. I again paint a distressed background with chalk paint before I make my own flowers to decoupage onto the background. This set is available from APrettyTalent.com under Miekie Crafts. Click here to navigate there."

Blog 211 - Making a Patchwork Comforter and Pillowcase Part 4
"It is time we finished the quilted patchwork comforter and pillow that we started with and have been doing over three preceding blogs. In this last of the blogs we add the finishing touches to both the pillow and the comforter. This means that we add the backing fabric and enclose everything neatly.
Here are the links to all of the blogs in the series:
Part 1
Part 2
Part 3
Part 4"

Blog 212 - Making a Continental Pillow Case
"We have been hard at work making two quilted patchwork comforters with matching pillows for a set of twins. Today I will show you how to make a continental pillowcase add a bit of flair to the beds. I use a fabric that breaks the monotony of the pink, though still blending in. I will not quilt or patch this pillowcase not wanting to let the technique overwhelm the room. The design on the fabric is cute enough to stand on its own and I embrace this fact."

Blog 213 - Make a Square Scatter Cushion
"We are a long way from finished with the bed sets we are preparing for those long awaited twins we are expecting. Today we will make a square scatter cushion for the bed. We use a printed fabric that is quite expensive and we want to make the most of the pictures on the fabric. This is why we keep the shape of the cushion quite simple."

Blog 214 - Make a Round Scatter Cushion
"A single scatter cushion on a bed is seldom successful. I love to fill my bed with cushions and pillows. That is why we make yet another scatter cushion for the bed sets we are busy with. This time we use a plainer fabric, but we opt for an interesting shape."

Blog 215 - Make a Heart-Shaped Scatter Cushion
"Today we will make the last of the scatter cushions for the bed set that we are busy with. This time we want to convey the message of love. When you want to tell a little girl that she is loved there are fewer things that will get the message across as successfully as a pink heart shaped cushion and that is precisely what we will be making today."

Blog 216 - Make a Bear-Shaped Cuddle Cushion Part 1
"Who does not know that a pillow has the ability to comfort? So do soft toys! The idea here is to make a soft toy without the bulk so that it will give way like a pillow. The ultimate in comfort. Best of all, these cushions has arms to cuddle back!
Here are the links to the three parts of this series:
Part 1
Part 2
Part 3"

Blog 217 - Make a Bear-Shaped Cuddle Cushion Part 2
"In the previous blog we have started making a cuddle cushion shaped like a bear. We took our time cutting out the various pieces and laying them all in place. In today's blog we will continue where we left off by doing the sewing.
Here are the links to the three parts of this series:
Part 1
Part 2
Part 3"

Blog 218 - Make a Bear-Shaped Cuddle Cushion Part 3
"It is time to put the finishing touches on the cuddle cushions we started in the previous two blogs. You can not tell me these cuties will not steal any girls heart! We bring the final pieces together in this blog and insert the stuffing before closing the bears up.
Here are the links to the three parts of this series:
Part 1
Part 2
Part 3"

Blog 219 - Sewing and Painting a Book Bag Library Part 1
"Every child needs to grow up surrounded by books and no date is too early to introduce them to the magic of books. Knowing this full well I was asked by a new mommy to make these book bag libraries for two newborn twin girls. What fun! We will combine a variety of techniques and skills in this project and turn the bags into learning opportunities for the girls while we're at it. We start by painting a modern version of Goldilocks.
Here are the links to the parts of the blog series:
Part 1 - Drawing and painting Goldilocks
Part 2 - Drawing and painting Papa Bear
Part 3 - Drawing and painting Mama Bear
Part 4 - Drawing and painting Baby Bear
Part 5 - Adding educational items to Goldilocks and Papa Bear
Part 6 - Adding educational items to Mama Bear and Baby Bear
Part 7 - Sewing the actual book bags"

Blog 220 - Sewing and Painting a Book Bag Library Part 2
"In the previous blog we started making two book bag libraries for two little girls. We had great fun drawing and painting a modern take on Goldilocks and today we will explore this theme a little further by drawing and painting Papa Bear.
Here are the links to the parts of the blog series:
Part 1 - Drawing and painting Goldilocks
Part 2 - Drawing and painting Papa Bear
Part 3 - Drawing and painting Mama Bear
Part 4 - Drawing and painting Baby Bear
Part 5 - Adding educational items to Goldilocks and Papa Bear
Part 6 - Adding educational items to Mama Bear and Baby Bear
Part 7 - Sewing the actual book bags"

Blog 221 - Sewing and Painting a Book Bag Library Part 3
"We are continuing where we left off with the previous two blogs. We are still preparing the panels for the book bag library we are making. In the first two blogs we drew and painted Goldilocks and Papa Bear. In this blog it is Mama Bear's turn.
Here are the links to the parts of the blog series:
Part 1 - Drawing and painting Goldilocks
Part 2 - Drawing and painting Papa Bear
Part 3 - Drawing and painting Mama Bear
Part 4 - Drawing and painting Baby Bear
Part 5 - Adding educational items to Goldilocks and Papa Bear
Part 6 - Adding educational items to Mama Bear and Baby Bear
Part 7 - Sewing the actual book bags"

Blog 222 - Sewing and Painting a Book Bag Library Part 4
"In the first three blogs in this series we have been painting the characters of the fairy tale Goldilocks and the three bears. We have allowed ourselves a more modern take on the story. Today it is the turn of the last character, Baby Bear.
Here are the links to the parts of the blog series:
Part 1 - Drawing and painting Goldilocks
Part 2 - Drawing and painting Papa Bear
Part 3 - Drawing and painting Mama Bear
Part 4 - Drawing and painting Baby Bear
Part 5 - Adding educational items to Goldilocks and Papa Bear
Part 6 - Adding educational items to Mama Bear and Baby Bear
Part 7 - Sewing the actual book bags"

Blog 223 - Sewing and Painting a Book Bag Library Part 5
"In the previous blogs we started making two book bag libraries for two little girls. We had loads of fun painting the faces of the characters for our theme on fabric. Today we lay the paint brushes aside to sew the bags together. Is it possible that this could be even more fun? You be the judge! We start with the sewing, but first we add some elements to aid in the fine motor skill development of the children.
Here are the links to the parts of the blog series:
Part 1 - Drawing and painting Goldilocks
Part 2 - Drawing and painting Papa Bear
Part 3 - Drawing and painting Mama Bear
Part 4 - Drawing and painting Baby Bear
Part 5 - Adding educational items to Goldilocks and Papa Bear
Part 6 - Adding educational items to Mama Bear and Baby Bear
Part 7 - Sewing the actual book bags"


Blog 224 - Sewing and Painting a Book Bag Library Part 6
We are nearing the finish line with book bag libraries that we are making. Today we will put the finishing touches on the remaining two characters, Mama Bear and Baby Bear, when we add some interesting elements to develop fine motor skills among other things. Tomorrow we will finish the bags by sewing the panels onto the backgrounds and making the actual pockets for the bags.
Here are the links to the parts of the blog series:
Part 1 - Drawing and painting Goldilocks
Part 2 - Drawing and painting Papa Bear
Part 3 - Drawing and painting Mama Bear
Part 4 - Drawing and painting Baby Bear
Part 5 - Adding educational items to Goldilocks and Papa Bear
Part 6 - Adding educational items to Mama Bear and Baby Bear
Part 7 - Sewing the actual book bags"


Blog 225 - Sewing and Painting a Book Bag Library Part 7
"In the previous blogs we started making two book bag libraries for two little girls. We had loads of fun painting the faces of the characters for our theme on fabric. We then laid the paint brushes aside to sew the bags together. We continue with the sewing today and finally put the finishing touches on the book bags.
Here are the links to the parts of the blog series:
Part 1 - Drawing and painting Goldilocks
Part 2 - Drawing and painting Papa Bear
Part 3 - Drawing and painting Mama Bear
Part 4 - Drawing and painting Baby Bear
Part 5 - Adding educational items to Goldilocks and Papa Bear
Part 6 - Adding educational items to Mama Bear and Baby Bear
Part 7 - Sewing the actual book bags"


Blog 226 - Make your own Silicone Molds
"I recently had a client who asked me to find her some specific molds. I became increasingly frustrated when nobody seemed to stock what I was looking for. I had to reply in the negative to the client, but remained dissatisfied with the result. I decided to search for ways to make my own molds. The results were encouraging. Then I started looking for the products used in the articles. I could not find a single one of them in South Africa. I could import, but by this time I was growing increasingly irritated with not being able to achieve success. I then decided to experiment with making my own silicone molds from widely available materials. Explore and experiment with me. Please feel free to give me advice and assistance at the end as I had no idea what I was doing here and went at it blindly."

Blog 227 - Allowing the Fabric to Dictate Design - Make a Fire Engine-Shaped Scatter Cushion
"I recently landed myself in trouble when I made two heart-shaped scatter cushions for my two nieces. My youngest nephew would not be happy with not getting anything and a pink heart-shaped cushion certainly would not satisfy him either. I ransacked the fabric stash and came across a very cute printed cotton blend with a fire engine theme. I decided on the spot that I would make him a fire engine from this fabric. The idea here is to allow the print on the fabric to complete the story that you are merely starting in the shape. Allow for some initiative to fill in the gaps. This is good for their development. When I gave him the cushion he asked me where the hose was. I told him he would have to add his own and without any further prompt a game ensued that relied heavily on association and fantasy. I could not wish for anything better!"

Blog 228 - Adjusting an Existing Pattern to Sew a Pleated Baby Bag Part 1
"Ever since I was asked to make two baby bags by a client I kept thinking I would draw up a brand new pattern for the project. The problem was that the client had already indicated that she liked a particular style of bag and it was one that I had already designed a pattern for. The more I thought about it, the clearer it became that I should use the existing pattern and simply make a few adjustments to the pattern. The pattern is available for free from the store and you can download it here. There are a number of other patterns as well. After you've seen how I adjusted this pattern, you may want to do the same with one of the others?
Read Part 1 here.
Read Part 2 here."

Blog 229 - Adjusting an Existing Pattern to Sew a Pleated Baby Bag Part 2
"We started making a baby bag in the previous blog. Instead of drawing up a brand new pattern, I opted to show you how you could easily use an existing pattern with a minor adjustments. We have started sewing the bag together in the previous blog and will finish it in today's blog. The pattern is available for free from the store and you can download it here. There are a number of other patterns as well.
Read Part 1 here.
Read Part 2 here."

Blog 230 - Make a Cast Rubber Mold
"Dala has a great product on the market for making your own molds. It is a liquid rubber that sets very quickly into the consistency we are familiar with for rubber. It is not unlike masking fluid used by water colorists either. Sadly I have dropped my bottle and it broke so that I had to very quickly transfer the contents to another bottle. This means that I can not show you the product, but I know your suppliers will be able to find it for you if you ask them for it. Let me show you how to use it."

Blog 231 - Casting Plaster of Paris in Various Molds
"We have been making molds and it is time to cast something in them. I decided to use some Plaster of Paris that I had on hand. If you have never done this, you will be amazed at how easy it is to do."

Blog 232 - Baking old-fashioned Milk Tart
"We have become so accustomed to quick milk tart recipes that we have quite forgotten the delight of a proper old-fashioned milk tart. Today I will walk you through the steps of baking this delightful tart and show you that it is not nearly as intricate as you were led to believe."

Blog 233 - Using Ready Bread Dough to Make Vetkoek
"Vetkoek is part and parcel of the South African diet and yet few of us have the time to make the dough, allow it to rise, knead it down and let it rise again. This is why it is so extremely convenient to be able to buy ready-made dough from the nearest supermarket and to turn that into vetkoek. Let me show you how easy it is to cheat your way into these delicious vetkoeke."

Blog 234 - Using Ready Dough to Bake Bread
"There are few things as delicious or enticing as freshly baked bread from the oven. Yet making time to bake bread is seldom an option. Let me show you how to treat yourself to delicious freshly baked bread without the hassle of mixing the dough. Once again, we buy the dough from the local supermarket, just as we did for miking vetkoek in the previous blog."

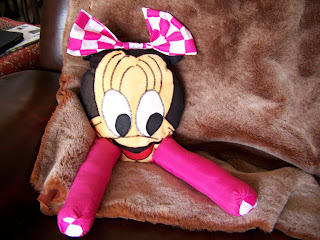
Blog 235 - Pattern Design: We design a pattern for a Minnie Mouse Cuddle Cushion Part 1
"I have written a series of three blogs before about two bear-shaped cuddle cushions I made on order. My nieces and nephew saw these and immediately demanded that I make them their own. The youngest niece is an ardent Minnie Mouse fan and it soon became apparent that I would have to make hers a Minnie Mouse Cuddle Cushion. This is slightly more intricate than the bears since I would be working with a loved and known character rather than a figment of my own imagination. For this reason I decided to draw up the pattern first instead of simply planning it straight on the fabric. If you are interested in pattern design then this blog is for you.
Easily navigate between the three parts of this blog series by clicking on the links provided:
Part 1
Part 2
Part 3"

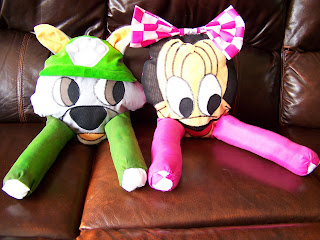
Blog 236 - Pattern Design: We design a pattern for a Rocky (from Paw Patrol) Cuddle Cushion Part 1
"When asked to design Cuddle Cushions for my nieces and nephew, the little boy at first wanted a Buzz Lightyear. He soon changed his mind when I pointed out to him that it would mean that the pillow would basically be flesh-colored and purple. This was when he decided upon Rocky from Paw Patrol. This aunt had to go on a Google search but soon found what I was looking for with his input. In this blog I show you how to design the pattern for this cute puppy before we make it.
Easily navigate between the differents parts of this 3 part blog series by following the links:
Part 1
Part 2
Part 3"

Blog 237 - Fabric Layout & Prep: We make a Minnie Mouse Cuddle Cushion Part 2
"We have started with the design and pattern of a Minnie Mouse Cuddle Cushion in Part 1 of this series. In today's blog we will cut the pattern out of fabric, stiffen the necessary parts with vilene and start the preparatory sewing. Tomorrow we will applique the face and put the cushion together.
Easily navigate between the three parts of this blog series by clicking on the links provided:
Blog 238 - Fabric Layout & Prep: We make a Rocky (from Paw Patrol) Cuddle Cushion Part 2

"We have started with the design and pattern of a Rocky (from Paw Patrol) Cuddle Cushion in Part 1 of this series. In today's blog we will cut the pattern out of fabric, stiffen the necessary parts with vilene and start the preparatory sewing. Tomorrow we will applique the face and put the cushion together.
Easily navigate between the different parts of this 3 part blog series by following the links:
Blog 239 - Applique & Construction: We make a Minnie Mouse Cuddle Cushion Part 3
"We have been working on the Minnie Mouse Cuddle Cushion for a while now and it is time to put the finishing touches to the cushion. In today's blog we will applique the face before we sew the different parts together and fill the cushion with stuffing.
Easily navigate between the three parts of this blog series by clicking on the links provided:
Blog 240 - Applique & Construction: We make a Rocky (from Paw Patrol) Cuddle Cushion Part 3
"I have been asked to turn the character of Rocky from the animation series Paw Patrol into a Cuddle Cushion and we have been working on this for two blogs already. Today we applique the face and put the different pieces together before filling the cushion with stuffing. Remember to post pictures of your own finished products.
Easily navigate between the differents parts of this 3 part blog series by following the links:
Blog 241 - Oil Painting of an Abandoned Car Wreck

"I was recently approached by someone who asked me to paint a specific photo for them. I do not know who the photographer is and wish I could give credit where it is due. There is something very characterful about abandoned wrecks and houses that seems to evoke a universal nostalgia with people. I also loved the setting hinting at wide open fields and skies. This was going to be fun to paint. The client was keen on having a textured painting on an A0 canvas. Lovely! I decided to do two different interpretations of the same photo. One would be painted smoothly and the other textured. This way I can show you some of the versatility of oil colors."

Blog 242 - Life's Journey Birthday Card
"In today's blog I show you how to make a symbolic card. I want to include a message that talks about wisdom that allows you to know when to hit the fuel and when to hit the brake pedals. I want to address the fact that there are bridges worth crossing and others that are better left alone. My solution was a card that would depict the message visually so that it would reinforce the writing inside. Let me show you how to make this very easy card."


Blog 243 - Naive Art Flower Card
"It is time to make a card for a very special person, my Mom. I know she loves naive art and decide to make her something along those lines. Being very fond of flowers, it is a no-brainer what I will be putting on the card. This card can be made with what is available in the house and requires nothing special. Best of all, you can get the children involved in helping to make it! Let me show you how."

Blog 244 - Textured Oil Painting of an Abandoned Car Wreck
"Clients approached me recently to paint a photo of their choice and I could not help getting excited when I saw the subject. I do not know who the photographer is to give credit where it is due. The client specified that they wanted a large canvas and finally settled on an A0 canvas. They also wanted the painting to be textured after having seen another painting I have painted with a palette knife. I have shown you how to paint this photo smoothly in a previous blog and now I will show you how to do a different interpretation where we add texture to the painting."

Blog 245 - A Summary with References of Blogs 1-50
"A number of people have mentioned that they find it difficult to find specific blogs among the growing list of published blogs. This gave me the idea of publishing a summary of previously published blogs, with links and photo references. This way you only need to save a handful of blogs which can easily be accessed to navigate to the blogs you are looking for. This is the first of these Index Blogs."

Blog 246 - Pack & Go Cake
"A friend invited me to go on holiday with her. There was only one minor snag. We would be going over the week of her birthday. The only reason this is a snag, is because I am a baker and I am convinced that absolutely everyone needs to have a cake on their birthdays. I ran through the options in my head, decided I knew which cake she would like best and started adapting the recipe so that it could be made in a 'foreign' kitchen with (possibly) the minimum of conveniences. It would be the first time I went to this specific place and I did not know what awaited me in terms of the kitchen. So let me explain. This blog was started before I went away and finished after I came back. The cake I chose to bake was a chocolate ganache cake."

Blog 247 - A Summary with References of Blogs 51-100
"A number of people have mentioned that they find it difficult to find specific blogs among the growing list of published blogs. This gave me the idea of publishing a summary of previously published blogs, with links and photo references. This way you only need to save a handful of blogs which can easily be accessed to navigate to the blogs you are looking for. This is the second of these Index Blogs."

Blog 248 - Make a Rabbit Cuddle Cushion - Pattern Design Part 1
"I have been making Cuddle Cushions for a number of people and recently were asked to make a rabbit as well. I figured more of you might be interested in this one and this blog is as a result of that. Imagine how cute this would be over Easter! I have once again photographed the steps for you, but the sheer number of steps forces me to publish it over three blogs. In this first blog we will draw up the pattern.

Blog 249 - Make a Rabbit Cuddle Cushion - Layout & Prep Part 2
"In the previous blog we have started with the construction of yet another Cuddle Cushion, this time in the shape of a rabbit. We designed the pattern in the part 1 of the blog series and today we will continue with part 2. In this blog we will cut out the fabric and do the preparatory work before we start sewing in earnest in Part 3.

Blog 250 - Make a Rabbit Cuddle Cushion - Sewing & Construction Part 3
"We have been working on a Cuddle Cushion in the shape of a rabbit for the past two blogs and it is time we put the finishing touches on it. In part 1 of the blog series we designed the pattern. I part 2 we cut out the fabric and did some preparatory sewing and ironing. In this last blog we will do the appliqueing before constructing the rabbit and filling it with stuffing.

For more crafty ideas and great products, visit APrettyTalent.com.
Remember to keep nurturing your TALENT for making PRETTY things.
You can subscribe to this blog and receive regular updates by email by simply registering your email address at the top of the current blog.
No comments:
Post a Comment