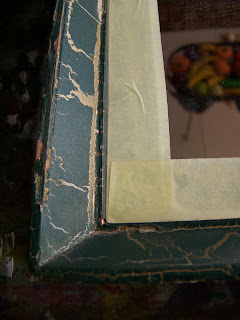
This is a close-up of the first mirror.
Stick masking tape right next to the frame on the mirror to ensure a sharp paint line where the frame meets the mirror.
Paint 1 layer of White Wash Chalk Paint over the whole frame and allow to dry. All of the paint is applied with a flat brush.
It will be rather obvious that a second layer of paint will be necessary, especially if you are covering a dark colour.
Once the first layer is dry, apply a second coat. You should now have a more solid White, but it may not be enough if you are covering a dark base colour.
Once the second colour is dry, move on to the top layer. This is when I switch to Petit Fours.
Paint the outer frame in this colour and allow to dry completely.
I choose Dark Pewter for the inner frame.
As the paint is not completely dry, but only touch dry, I do not want to put masking tape on it yet, or it will pull off with the masking tape. Instead, I use a metal ruler with a sharp edge to prevent paint smears from reaching the outer frame. I am now able to paint the inner frame.
You may need to reposition the ruler to paint the full length of the mirror.
Wipe the ruler clean every time you lift it to prevent unwanted paint smudges.
Apply 2-3 coats of varnish, especially if the mirror will be in a place with a lot of steam, such as a bathroom.
Once the varnish is dry, you can pull the masking tape away.
You can now hang the mirror.
Mirror 2
This is a close-up shot of the second mirror. I could use wood putty to fill the broken edges of the frame, but I choose to work with this, allowing it to assist the distressed appearance on this frame.
Stick masking tape right next to the frame on the mirror to ensure a sharp paint line where the frame meets the mirror.
I need to cover the green before I can apply the semi-transparent colour. For that reason I start with a coat of White Wash.
Wait for the paint to dry before moving on to the next layer.
My second coat is Moulin Rouge.
It becomes obvious that I will need yet another coat before the colour will be established.
The second coat gives me the platform I want to work from. Wait for it to dry completely.
I will now paint English Rose over the Moulin Rouge.
A close-up view will show that the Moulin Rouge is still gently visible through the paler English Rose. This is the effect I have hoped for.
I will use Clear Wax to seal the paint.
Apply the Clear Wax with a soft cloth.
I will use Dark Wax to create the distressed look.
Apply the Dark Wax heavily on the edges. I find using my finger best.
Apply the Dark Wax lightly on the wide sides of the frame.
You can now pull away the masking tape.
At last the mirror is ready to hang.
For more crafty ideas and great products, visit APrettyTalent.com.
Remember to keep nurturing your TALENT for making PRETTY things.
You can subscribe to this blog and receive regular updates by email by simply registering your email address at the top of the current blog.


No comments:
Post a Comment