Search This Blog

Friday 20 January 2017

Sewing A Lined Skirt

There is such beautiful sheer fabric on the market that one sometimes can not resist buying this. I had some of these see-through fabric left over from a project and decided to turn this into a skirt for my older niece. However, that would mean that I would have to line the skirt if she were to have any hope of wearing it. I show you how to line a skirt with an elastic waist in today's blog.


I cut a simple rectangle the full width of the fabric for the skirt.


My mom had a blue lining ready-made that she had taken out of a skirt. Alternatively, I would have cut the lining exactly the same as the skirt, as well as making it the same way.


Sew the side seams for the skirt. (You would also need to sew the side seams for the lining if yours weren't ready-made).


Hem the skirt. The lining is cut slightly shorter than the skirt and does not need to be hemmed. Simply overlock the lining.


Pin the lining to the skirt at the waist.


Staystitch the lining to the skirt.


Fold the waist over to create a 'tube' that you can pull an elastic through.


Sew the 'tube' at the waist.


Leave a small gap open (shown between the pins) to insert the elastic.


Pull the elastic through.


Sew the ends of the elastic together.


In now time at all, you will have made a lined skirt with an elastic band.


Here is my little model, straight from the swimming pool, to fit her skirt.


Marietjie Uys (Miekie) is a published author. You can buy the books here:
You can purchase Designs By Miekie 1 here.
Jy kan Kom Ons Teken en Verf Tuinstories hier koop.
Jy kan Kom Ons Kleur Tuinstories In hier koop.
Jy kan Tuinstories hier koop.
You can follow Miekie's daily Bible Study blog, Bybel Legkaart, here in English & Afrikaans.
For more crafty ideas and great products, visit A Pretty Talent on Facebook.
Remember to keep nurturing your TALENT for making PRETTY things.
You can subscribe to this blog and receive regular updates by email by simply registering your email address at the top of the current blog.

Thursday 19 January 2017

Sewing A Girls' Dress With A Double Bodice

Not too long ago, I had to replace a zipper that had stripped. I kept the old zipper, thinking that I might be able to do something with it. I got my chance today when I used it as decorations on a dress I made for my niece. I also show you how to sew a dress with a double bodice, rather than facings, and a pleated skirt, in today's blog.


I cut the skirt for this dress the entire width of the fabric in a straight square.


I used the bodice I had cut for another dress as guide for this dress. This time I raised the waistline.


Both the front and back bodices were cut in this manner. Take note that two front and two back bodices had been cut as I am cutting a double layer of fabric in the photo.


I fold the skirt of the dress over on itself and sew the single seam that needs sewing to form a tube.


I then found some lovely ribbon to use as decoration on the bodice.


I pulled the stripped zipper closer to see if it would fit across the width of the bodice. It would work nicely!


I cut the two ends of the zipper off and laid it in place above and below the ribbon I wanted to add. I loved the result!


I then pinned the first half of the zipper in place and sewed it onto the bodice.


I then took careful measurements before sewing the other half of the zipper onto the bodice.


I then sewed the wide ribbon onto the bodice with two seams.


Isn't that cute?!


Now I folded the back bodice panels in half and cut them open at the back seam to insert a real zipper here. (I knew I had enough space from having made the green dress of the previous blog on the same pattern).


Sew only ONE of the back bodices along the center back line.


Iron this seam open.


Sew the side seams of the outer bodice.


Divide the bottom of the bodice, as well as the waist of the skirt in quarters.


Pin the quarters of the bodice to the quarter markings of the skirt, making sure the center back of the bodice and the seam of the skirt line up.


Pleat and pin the skirt in between these quarters. Make sure you distribute the fabric evenly.


Sew the skirt to the bodice.


Pin a zipper to the center back of the bodice and skirt.


Sew as close to the zipper as possible.


Unpick the seam on top of the zipper to reveal the beautifully hidden zipper you have just inserted.


Pin the shoulders.


Sew the shoulder seams.


We now turn our attention to the inner bodice. Lay the panels on top of each other with right sides facing. Pin the shoulders and sides, and sew them


Iron all of the seam open. This is what the inner bodice should look like now.


Pin the hem of the skirt with a rolled hem.


Hem the skirt.


Pin the inner bodice to the outer bodice, folding the edges in as you pin. Pin along the center back, the neckline, and both armholes.


Sew the lining bodice to the dress by hand. You may also want to catch the waist in a couple of places to keep the little one from getting tangled up in the confusion of two bodices.


The completed dress.


Those little hands simply could not stay off the zippers on the front. She simply loved the texture it added to the dress. I was scolded because I did not make this into a pocket, though!


Marietjie Uys (Miekie) is a published author. You can buy the books here:
You can purchase Designs By Miekie 1 here.
Jy kan Kom Ons Teken en Verf Tuinstories hier koop.
Jy kan Kom Ons Kleur Tuinstories In hier koop.
Jy kan Tuinstories hier koop.
You can follow Miekie's daily Bible Study blog, Bybel Legkaart, here in English & Afrikaans.
For more crafty ideas and great products, visit A Pretty Talent on Facebook.
Remember to keep nurturing your TALENT for making PRETTY things.
You can subscribe to this blog and receive regular updates by email by simply registering your email address at the top of the current blog.

Wednesday 18 January 2017

Make A Giant Butterfly Card From Your Coloured Pictures

A couple of blogs ago I shared some tips for blending your coloured pencil work with rubbing alcohol. At the time, I mentioned that I would be using the picture I demonstrated on, in an upcoming blog. Today, I use that particular picture to make a giant card. We do some layering and dimensional work, among other nifty tricks of the trade. The original picture was taken from my book Designs By Miekie 1, which is available in ebook format, making it easy to resize and print pictures as often as you need them, or to enlarge them using a projector, for bigger projects.


When I left off at the previous blog, we had a lovely coloured picture that would probably end up in a cupboard somewhere if we did not find a use for it.


As my picture is A4 in size, I needed to make a card that was double that. A3 is double A4, and therefore perfect for the job. I opted to use a green that echoed the center of the butterfly.


As I stated in the previous blog already, I did not wish to retain the white areas of the coloured page, I would therefore need a different background. I searched among my 12" x 12" craft paper and found one that I liked. It underscored the idea of a flower garden.


Fold the A3 cardboard in half to create the card.


Crop the craft paper to be slightly smaller than A4 so as to fit on the card, leaving a little edge on all 4 sides.


Ink the edges of the card.


Ink the edges of the matting.


Use double-sided tape to attach the matting to the card.


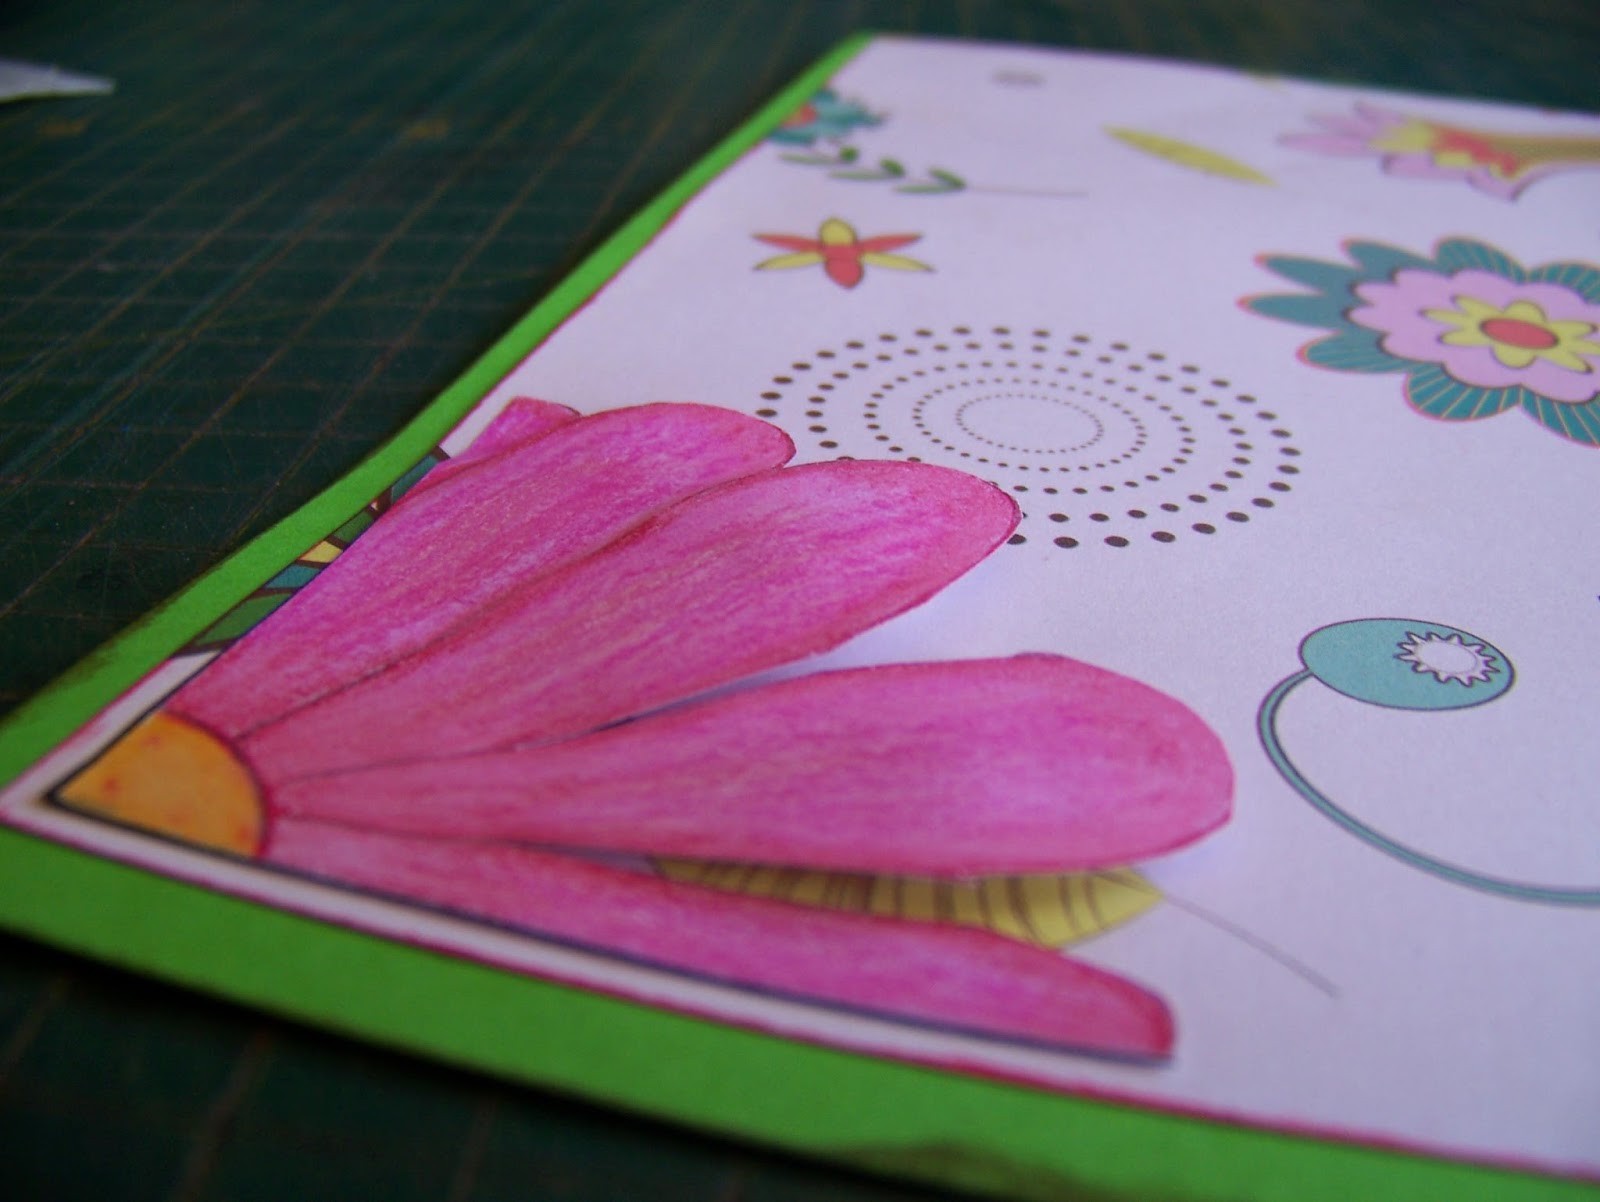
Carfully cut the flowers and the butterfly out. I switch to a craft knife for the delicate areas.


Cut a little ways into the petals of the flowers to separate them slightly. Cut about halfway into the petals, along the petal lines.


Use double-sided tape on the center of the flower, as well as the two outer petals. Use 3-D double-sided tape on the 2nd and 4th petals and use 2 layers of 3-D double-sided tape on the petal in the middle.


Here you can see the double layer of double-sided tape for the center petal.


You have just created a gradual incline and decline for your petals, making the card ever so much more interesting than it would be otherwise.


Repeat these steps for the other flower as well.


Cut apart the wings on the butterfly in the same way that you cut the petals on the flower.


Use double-sided tape on the body of the butterfly. Use 3-D double-sided tape on the back wings and use two layers of 3-D double-sided tape on the front wings..


I use the fine point on my Tombow glue dispenser for the areas that were too small to be attached with double-sided tape.


When you stick your butterfly in place, you will have created something that simulates flight by creating different depth perspectives.


Note how the butterfly seems to be pulling up and away from the page.


As a last surprise element, I add a few scattered rhinestones to the flowers in the background. I keep these to a minimum so as not the detract from the focal point, which is the butterfly.


Adding a tiny bit of bling to the background, pulls it into the picture, ensuring that it is not viewed as an accidental background.


Not taking the time required to colour the picture into account, this card can be made in about half an hour or so. Well worth the trouble, wouldn't you agree? Imagine how happy you can make a teacher's heart if you present her with such a happy card to thank her for the hard work and effort she put into your child. Or who do you have in mind for your card?


Marietjie Uys (Miekie) is a published author. You can buy the books here:
You can purchase Designs By Miekie 1 here.
Jy kan Kom Ons Teken en Verf Tuinstories hier koop.
Jy kan Kom Ons Kleur Tuinstories In hier koop.
Jy kan Tuinstories hier koop.
For more crafty ideas and great products, visit A Pretty Talent on Facebook.
Remember to keep nurturing your TALENT for making PRETTY things.
You can subscribe to this blog and receive regular updates by email by simply registering your email address at the top of the current blog.