I did not test any of the water-soluble pencils for this experiment. Instead, I tested, from top to bottom, Derwent Studio, a pencil that came with the Art Therapy magazine, Faber Castell Polychromos, Derwent Drawing, Derwent Academy and Derwent Coloursoft. On the left, you can see the results of blending the pencils with rubbing alcohol, compared to the same pencil's markings, without any blending. Impressive, isn't it? What I love about this option, is that the rubbing alcohol does not leave any oily residue and evaporates very quickly. It also does not wet the paper to the point of weakening it.
Here is a close-up view of the results.
For those of you who are unfamiliar with rubbing alcohol, it can be purchased from your local pharmacy straight off the shelf. I used an earbud to blend with.
I then remembered that I had two more pencil sets that could be tested. At the top I tested Marco Raffine and at the bottom is Goldfaber Studio.
The overall results close up.
I then went to my adult colouring books to find a suitable picture to colour. As usual, I was disgusted to find that the pictures are made up of hundreds of small spaces that do not lend itself to shading or blending! That was when I turned to my own Design book, Designs By Miekie 1. (You can simply click on the highlighted words if you wish to purchase a copy of the ebook). I liked the butterfly series for what I wanted to do and quickly traced the design, as my printer was out of ink. Fortunately, I had the original to work from!
I started by creating some deep shade areas with a black pencil.
I then used two shades of orange on the body of the butterfly.
A brown and ochre colour was used to finish the body and head.
I then used a deep orange on the top wings.
Yellow filled in the space.
The detail was started in red.
Here you have a better view of what I did with the red.
I finished the detail in pink.
Here you can see more clearly what I did with the pink.
Dark blue is used on the outline of the wings.
A paler blue finishes what I started in the dark blue.
I then used a deep green.
It was filled in with a light green.
Back to deep orange.
Returning once more to yellow.
I then used orange on the flowers.
Shading and detail was added with red.
Pink was used to fill in the petals.
A very pale pink was used for the highlights on the petals.
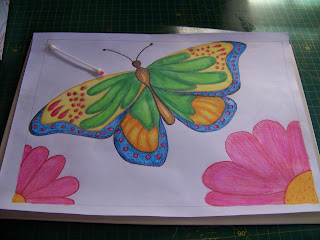
The whole picture was now coloured. I opted not to colour the background for reasons that will become clear in a future blog. If you look carefully, you can see that I did not bother to colour very neatly. There are obvious lines showing in the colouring that would normally be unacceptable to me.
I now started the blending process with the rubbing alcohol. I started on the greens.
In this photo you can see the difference the rubbing alcohol makes to the picture. The left side has already been blended, while the right has only been coloured without any blending.
When both sides of the green have been blended.
I then blended the orange, yellow and brown areas.
I moved on to the reds and pinks.
Now it was time to do the blues.
The finished picture simply takes your breath away. The best part is that I did not over exert myself with a paper stump or other blender. Very nice! This experiment paid off in great dividends and I will definitely use the rubbing alcohol more frequently.
You can purchase Designs By Miekie 1 here.
Jy kan Kom Ons Teken en Verf Tuinstories hier koop.Jy kan Kom Ons Kleur Tuinstories In hier koop.
Jy kan Tuinstories hier koop.
For more crafty ideas and great products, visit A Pretty Talent on Facebook.
Remember to keep nurturing your TALENT for making PRETTY things.
You can subscribe to this blog and receive regular updates by email by simply registering your email address at the top of the current blog.


No comments:
Post a Comment