Blogs 1-50
Blogs 51-100
Blogs 101-150
Blog 51 - Making a French Beret with a Cap Republished Part 2 of 2
"We started with the construction of this cute French Beret with cap yesterday and managed to finish the cap and headband. Today we will make the lid and the lining, before bringing all the pieces together. The pattern is available from APrettyTalent.com and can be downloaded here.

"We started with the construction of this cute French Beret with cap yesterday and managed to finish the cap and headband. Today we will make the lid and the lining, before bringing all the pieces together. The pattern is available from APrettyTalent.com and can be downloaded here.
The previous blog series can be viewed by simply clicking on the part you want to view:
Part 4"
Blog 52 - Transferring an image from paper to fabric
"I've had this fabulous paper in my paper stash for a few years now and have always been reluctant to use it because I loved it so much. Have you experienced the same? I found the perfect craft for it though when I was looking for a design for two panels for a handbag I was making. This design would be perfect! But how to get it from paper to fabric? No fear, there is a great product on the market for this purpose; Dala's Picture Perfect!"

Blog 53 - Rock, paper, scissors? No! Paper, fabric, wood - all in one project
"We spent a great many hours yesterday transferring an image from paper to fabric. What do we do with it now? Well, I turned it into a handbag, but you are free to do with it what you please. Let me share with you some of my ideas."

"I've had this fabulous paper in my paper stash for a few years now and have always been reluctant to use it because I loved it so much. Have you experienced the same? I found the perfect craft for it though when I was looking for a design for two panels for a handbag I was making. This design would be perfect! But how to get it from paper to fabric? No fear, there is a great product on the market for this purpose; Dala's Picture Perfect!"
Blog 53 - Rock, paper, scissors? No! Paper, fabric, wood - all in one project
"We spent a great many hours yesterday transferring an image from paper to fabric. What do we do with it now? Well, I turned it into a handbag, but you are free to do with it what you please. Let me share with you some of my ideas."
Blog 54 - Make a Stylish Photo Pin-Up Board
"Ever since I bought this fabric to make a series of handbags from, I have been toying with the idea of using it to make a comforter and some scatter cushions from. I was working towards a goal though, and did not spend too much time pondering the idea. Then I had some time today and decided to make a photo pin-up board with the little fabric I had left. I loved this so much that I think I will buy some more fabric if it is still available and make the bed set after all. In the meantime, let me show you how to make this Photo Pin-Up Board for yourself. Or simply buy the one in the picture from APrettyTalent.com by clicking here."

"Ever since I bought this fabric to make a series of handbags from, I have been toying with the idea of using it to make a comforter and some scatter cushions from. I was working towards a goal though, and did not spend too much time pondering the idea. Then I had some time today and decided to make a photo pin-up board with the little fabric I had left. I loved this so much that I think I will buy some more fabric if it is still available and make the bed set after all. In the meantime, let me show you how to make this Photo Pin-Up Board for yourself. Or simply buy the one in the picture from APrettyTalent.com by clicking here."
Blog 55 - Making a Patchwork Comforter and Pillowcase Part 1
"I was approached to make the soft furnishings for two baby girls that are soon to arrive. The mom wanted everything in bright pink and she expressed being fond of patchwork quilts. I therefore set out to see what I could make to meet the demand. Travel the journey with me and I'll show how easy it is to do some of the things you always thought were reserved for people other than yourself.
Here are the links to all of the blogs in the series:
Part 1
Part 2
Part 3
Part 4"
Blog 56 - Making a Patchwork Comforter and Pillowcase Part 2
"In Part 1 of the series we started by measuring and cutting the squares that would be needed to make a quilted patchwork comforter and pillowcase set. We continue with this project today when we do the quilting and patchwork for the two pillowcases.
Here are the links to all of the blogs in the series:
Part 1
Part 2
Part 3
Part 4"
Blog 57 - Making a Quilted Patchwork Comforter and Pillowcase Part 3
"We are busy making a quilted patchwork comforter/duvet cover with matching pillowcases. We finished the quilting and patchwork on the pillowcases in the previous blog. Today we continue the process when we start to assemble the comforter.
Here are the links to all of the blogs in the series:
Part 1
Part 2
Part 3
Part 4"
Blog 58 - Painting Proteas on a Runner Part 1
"I have been asked to paint a table runner with Proteas, to match a set of place-mats and coasters. Since the client was thousands of kilometres away, I only had photographs to work from. The challenge was on! Let me show you how I met it."

Blog 59 - Painting Proteas on a Runner Part 2
"In Part 1 of this project we carefully planned and drew the Proteas on the runner. We then started adding color with Acrilpen, outlining the various parts to make the drawings clearer and to add essential shadows. Today we start painting in all earnest."

"I have been asked to paint a table runner with Proteas, to match a set of place-mats and coasters. Since the client was thousands of kilometres away, I only had photographs to work from. The challenge was on! Let me show you how I met it."
Blog 59 - Painting Proteas on a Runner Part 2
"In Part 1 of this project we carefully planned and drew the Proteas on the runner. We then started adding color with Acrilpen, outlining the various parts to make the drawings clearer and to add essential shadows. Today we start painting in all earnest."
Blog 60 - Making a Patchwork Comforter and Pillowcase Part 4
"It is time we finished the quilted patchwork comforter and pillow that we started with and have been doing over three preceding blogs. In this last of the blogs we add the finishing touches to both the pillow and the comforter. This means that we add the backing fabric and enclose everything neatly.
Here are the links to all of the blogs in the series:
Part 1
Part 2
Part 3
Part 4"

Blog 61 - Making a Continental Pillow Case
"We have been hard at work making two quilted patchwork comforters with matching pillows for a set of twins. Today I will show you how to make a continental pillowcase add a bit of flair to the beds. I use a fabric that breaks the monotony of the pink, though still blending in. I will not quilt or patch this pillowcase not wanting to let the technique overwhelm the room. The design on the fabric is cute enough to stand on its own and I embrace this fact."

Blog 62 - Make a Square Scatter Cushion
"We are a long way from finished with the bed sets we are preparing for those long awaited twins we are expecting. Today we will make a square scatter cushion for the bed. We use a printed fabric that is quite expensive and we want to make the most of the pictures on the fabric. This is why we keep the shape of the cushion quite simple."

Blog 63 - Make a Round Scatter Cushion
"A single scatter cushion on a bed is seldom successful. I love to fill my bed with cushions and pillows. That is why we make yet another scatter cushion for the bed sets we are busy with. This time we use a plainer fabric, but we opt for an interesting shape."

Blog 64 - Make a Heart-Shaped Scatter Cushion
"Today we will make the last of the scatter cushions for the bed set that we are busy with. This time we want to convey the message of love. When you want to tell a little girl that she is loved there are fewer things that will get the message across as successfully as a pink heart shaped cushion and that is precisely what we will be making today."

Blog 65 - Make a Bear-Shaped Cuddle Cushion Part 1
"Who does not know that a pillow has the ability to comfort? So do soft toys! The idea here is to make a soft toy without the bulk so that it will give way like a pillow. The ultimate in comfort. Best of all, these cushions has arms to cuddle back!
Here are the links to the three parts of this series:
Part 1
Part 2
Part 3"

Blog 66 - Make a Bear-Shaped Cuddle Cushion Part 2
"In the previous blog we have started making a cuddle cushion shaped like a bear. We took our time cutting out the various pieces and laying them all in place. In today's blog we will continue where we left off by doing the sewing.
Here are the links to the three parts of this series:
Part 1
Part 2
Part 3"

Blog 67 - Make a Bear-Shaped Cuddle Cushion Part 3
"It is time to put the finishing touches on the cuddle cushions we started in the previous two blogs. You can not tell me these cuties will not steal any girls heart! We bring the final pieces together in this blog and insert the stuffing before closing the bears up.
Here are the links to the three parts of this series:
Part 1
Part 2
Part 3"

Blog 68 - Sewing and Painting a Book Bag Library Part 1
"Every child needs to grow up surrounded by books and no date is too early to introduce them to the magic of books. Knowing this full well I was asked by a new mommy to make these book bag libraries for two newborn twin girls. What fun! We will combine a variety of techniques and skills in this project and turn the bags into learning opportunities for the girls while we're at it. We start by painting a modern version of Goldilocks.
Here are the links to the parts of the blog series:
Part 1 - Drawing and painting Goldilocks
Part 2 - Drawing and painting Papa Bear
Part 3 - Drawing and painting Mama Bear
Part 4 - Drawing and painting Baby Bear
Part 5 - Adding educational items to Goldilocks and Papa Bear
Part 6 - Adding educational items to Mama Bear and Baby Bear
Part 7 - Sewing the actual book bags"

Blog 69 - Sewing and Painting a Book Bag Library Part 2
"In the previous blog we started making two book bag libraries for two little girls. We had great fun drawing and painting a modern take on Goldilocks and today we will explore this theme a little further by drawing and painting Papa Bear.
Here are the links to the parts of the blog series:
Part 1 - Drawing and painting Goldilocks
Part 2 - Drawing and painting Papa Bear
Part 3 - Drawing and painting Mama Bear
Part 4 - Drawing and painting Baby Bear
Part 5 - Adding educational items to Goldilocks and Papa Bear
Part 6 - Adding educational items to Mama Bear and Baby Bear
Part 7 - Sewing the actual book bags"

Blog 70 - Sewing and Painting a Book Bag Library Part 3
"We are continuing where we left off with the previous two blogs. We are still preparing the panels for the book bag library we are making. In the first two blogs we drew and painted Goldilocks and Papa Bear. In this blog it is Mama Bear's turn.
Here are the links to the parts of the blog series:
Part 1 - Drawing and painting Goldilocks
Part 2 - Drawing and painting Papa Bear
Part 3 - Drawing and painting Mama Bear
Part 4 - Drawing and painting Baby Bear
Part 5 - Adding educational items to Goldilocks and Papa Bear
Part 6 - Adding educational items to Mama Bear and Baby Bear
Part 7 - Sewing the actual book bags"

Blog 71 - Sewing and Painting a Book Bag Library Part 4
"In the first three blogs in this series we have been painting the characters of the fairy tale Goldilocks and the three bears. We have allowed ourselves a more modern take on the story. Today it is the turn of the last character, Baby Bear.
Here are the links to the parts of the blog series:
Part 1 - Drawing and painting Goldilocks
Part 2 - Drawing and painting Papa Bear
Part 3 - Drawing and painting Mama Bear
Part 4 - Drawing and painting Baby Bear
Part 5 - Adding educational items to Goldilocks and Papa Bear
Part 6 - Adding educational items to Mama Bear and Baby Bear
Part 7 - Sewing the actual book bags"

Blog 72 - Sewing and Painting a Book Bag Library Part 5
"In the previous blogs we started making two book bag libraries for two little girls. We had loads of fun painting the faces of the characters for our theme on fabric. Today we lay the paint brushes aside to sew the bags together. Is it possible that this could be even more fun? You be the judge! We start with the sewing, but first we add some elements to aid in the fine motor skill development of the children.
Here are the links to the parts of the blog series:
Part 1 - Drawing and painting Goldilocks
Part 2 - Drawing and painting Papa Bear
Part 3 - Drawing and painting Mama Bear
Part 4 - Drawing and painting Baby Bear
Part 5 - Adding educational items to Goldilocks and Papa Bear
Part 6 - Adding educational items to Mama Bear and Baby Bear
Part 7 - Sewing the actual book bags"


Blog 73 - Sewing and Painting a Book Bag Library Part 6
We are nearing the finish line with book bag libraries that we are making. Today we will put the finishing touches on the remaining two characters, Mama Bear and Baby Bear, when we add some interesting elements to develop fine motor skills among other things. Tomorrow we will finish the bags by sewing the panels onto the backgrounds and making the actual pockets for the bags.
Here are the links to the parts of the blog series:
Part 1 - Drawing and painting Goldilocks
Part 2 - Drawing and painting Papa Bear
Part 3 - Drawing and painting Mama Bear
Part 4 - Drawing and painting Baby Bear
Part 5 - Adding educational items to Goldilocks and Papa Bear
Part 6 - Adding educational items to Mama Bear and Baby Bear
Part 7 - Sewing the actual book bags"


Blog 74 - Sewing and Painting a Book Bag Library Part 7
"In the previous blogs we started making two book bag libraries for two little girls. We had loads of fun painting the faces of the characters for our theme on fabric. We then laid the paint brushes aside to sew the bags together. We continue with the sewing today and finally put the finishing touches on the book bags.
Here are the links to the parts of the blog series:
Part 1 - Drawing and painting Goldilocks
Part 2 - Drawing and painting Papa Bear
Part 3 - Drawing and painting Mama Bear
Part 4 - Drawing and painting Baby Bear
Part 5 - Adding educational items to Goldilocks and Papa Bear
Part 6 - Adding educational items to Mama Bear and Baby Bear
Part 7 - Sewing the actual book bags"


"It is time we finished the quilted patchwork comforter and pillow that we started with and have been doing over three preceding blogs. In this last of the blogs we add the finishing touches to both the pillow and the comforter. This means that we add the backing fabric and enclose everything neatly.
Here are the links to all of the blogs in the series:
Part 1
Part 2
Part 3
Part 4"
Blog 61 - Making a Continental Pillow Case
"We have been hard at work making two quilted patchwork comforters with matching pillows for a set of twins. Today I will show you how to make a continental pillowcase add a bit of flair to the beds. I use a fabric that breaks the monotony of the pink, though still blending in. I will not quilt or patch this pillowcase not wanting to let the technique overwhelm the room. The design on the fabric is cute enough to stand on its own and I embrace this fact."
Blog 62 - Make a Square Scatter Cushion
"We are a long way from finished with the bed sets we are preparing for those long awaited twins we are expecting. Today we will make a square scatter cushion for the bed. We use a printed fabric that is quite expensive and we want to make the most of the pictures on the fabric. This is why we keep the shape of the cushion quite simple."
Blog 63 - Make a Round Scatter Cushion
"A single scatter cushion on a bed is seldom successful. I love to fill my bed with cushions and pillows. That is why we make yet another scatter cushion for the bed sets we are busy with. This time we use a plainer fabric, but we opt for an interesting shape."
Blog 64 - Make a Heart-Shaped Scatter Cushion
"Today we will make the last of the scatter cushions for the bed set that we are busy with. This time we want to convey the message of love. When you want to tell a little girl that she is loved there are fewer things that will get the message across as successfully as a pink heart shaped cushion and that is precisely what we will be making today."
Blog 65 - Make a Bear-Shaped Cuddle Cushion Part 1
"Who does not know that a pillow has the ability to comfort? So do soft toys! The idea here is to make a soft toy without the bulk so that it will give way like a pillow. The ultimate in comfort. Best of all, these cushions has arms to cuddle back!
Here are the links to the three parts of this series:
Part 1
Part 2
Part 3"
Blog 66 - Make a Bear-Shaped Cuddle Cushion Part 2
"In the previous blog we have started making a cuddle cushion shaped like a bear. We took our time cutting out the various pieces and laying them all in place. In today's blog we will continue where we left off by doing the sewing.
Here are the links to the three parts of this series:
Part 1
Part 2
Part 3"
Blog 67 - Make a Bear-Shaped Cuddle Cushion Part 3
"It is time to put the finishing touches on the cuddle cushions we started in the previous two blogs. You can not tell me these cuties will not steal any girls heart! We bring the final pieces together in this blog and insert the stuffing before closing the bears up.
Here are the links to the three parts of this series:
Part 1
Part 2
Part 3"
Blog 68 - Sewing and Painting a Book Bag Library Part 1
"Every child needs to grow up surrounded by books and no date is too early to introduce them to the magic of books. Knowing this full well I was asked by a new mommy to make these book bag libraries for two newborn twin girls. What fun! We will combine a variety of techniques and skills in this project and turn the bags into learning opportunities for the girls while we're at it. We start by painting a modern version of Goldilocks.
Here are the links to the parts of the blog series:
Part 1 - Drawing and painting Goldilocks
Part 2 - Drawing and painting Papa Bear
Part 3 - Drawing and painting Mama Bear
Part 4 - Drawing and painting Baby Bear
Part 5 - Adding educational items to Goldilocks and Papa Bear
Part 6 - Adding educational items to Mama Bear and Baby Bear
Part 7 - Sewing the actual book bags"
Blog 69 - Sewing and Painting a Book Bag Library Part 2
"In the previous blog we started making two book bag libraries for two little girls. We had great fun drawing and painting a modern take on Goldilocks and today we will explore this theme a little further by drawing and painting Papa Bear.
Here are the links to the parts of the blog series:
Part 1 - Drawing and painting Goldilocks
Part 2 - Drawing and painting Papa Bear
Part 3 - Drawing and painting Mama Bear
Part 4 - Drawing and painting Baby Bear
Part 5 - Adding educational items to Goldilocks and Papa Bear
Part 6 - Adding educational items to Mama Bear and Baby Bear
Part 7 - Sewing the actual book bags"
Blog 70 - Sewing and Painting a Book Bag Library Part 3
"We are continuing where we left off with the previous two blogs. We are still preparing the panels for the book bag library we are making. In the first two blogs we drew and painted Goldilocks and Papa Bear. In this blog it is Mama Bear's turn.
Here are the links to the parts of the blog series:
Part 1 - Drawing and painting Goldilocks
Part 2 - Drawing and painting Papa Bear
Part 3 - Drawing and painting Mama Bear
Part 4 - Drawing and painting Baby Bear
Part 5 - Adding educational items to Goldilocks and Papa Bear
Part 6 - Adding educational items to Mama Bear and Baby Bear
Part 7 - Sewing the actual book bags"
Blog 71 - Sewing and Painting a Book Bag Library Part 4
"In the first three blogs in this series we have been painting the characters of the fairy tale Goldilocks and the three bears. We have allowed ourselves a more modern take on the story. Today it is the turn of the last character, Baby Bear.
Here are the links to the parts of the blog series:
Part 1 - Drawing and painting Goldilocks
Part 2 - Drawing and painting Papa Bear
Part 3 - Drawing and painting Mama Bear
Part 4 - Drawing and painting Baby Bear
Part 5 - Adding educational items to Goldilocks and Papa Bear
Part 6 - Adding educational items to Mama Bear and Baby Bear
Part 7 - Sewing the actual book bags"
Blog 72 - Sewing and Painting a Book Bag Library Part 5
"In the previous blogs we started making two book bag libraries for two little girls. We had loads of fun painting the faces of the characters for our theme on fabric. Today we lay the paint brushes aside to sew the bags together. Is it possible that this could be even more fun? You be the judge! We start with the sewing, but first we add some elements to aid in the fine motor skill development of the children.
Here are the links to the parts of the blog series:
Part 1 - Drawing and painting Goldilocks
Part 2 - Drawing and painting Papa Bear
Part 3 - Drawing and painting Mama Bear
Part 4 - Drawing and painting Baby Bear
Part 5 - Adding educational items to Goldilocks and Papa Bear
Part 6 - Adding educational items to Mama Bear and Baby Bear
Part 7 - Sewing the actual book bags"
Blog 73 - Sewing and Painting a Book Bag Library Part 6
We are nearing the finish line with book bag libraries that we are making. Today we will put the finishing touches on the remaining two characters, Mama Bear and Baby Bear, when we add some interesting elements to develop fine motor skills among other things. Tomorrow we will finish the bags by sewing the panels onto the backgrounds and making the actual pockets for the bags.
Here are the links to the parts of the blog series:
Part 1 - Drawing and painting Goldilocks
Part 2 - Drawing and painting Papa Bear
Part 3 - Drawing and painting Mama Bear
Part 4 - Drawing and painting Baby Bear
Part 5 - Adding educational items to Goldilocks and Papa Bear
Part 6 - Adding educational items to Mama Bear and Baby Bear
Part 7 - Sewing the actual book bags"
Blog 74 - Sewing and Painting a Book Bag Library Part 7
"In the previous blogs we started making two book bag libraries for two little girls. We had loads of fun painting the faces of the characters for our theme on fabric. We then laid the paint brushes aside to sew the bags together. We continue with the sewing today and finally put the finishing touches on the book bags.
Here are the links to the parts of the blog series:
Part 1 - Drawing and painting Goldilocks
Part 2 - Drawing and painting Papa Bear
Part 3 - Drawing and painting Mama Bear
Part 4 - Drawing and painting Baby Bear
Part 5 - Adding educational items to Goldilocks and Papa Bear
Part 6 - Adding educational items to Mama Bear and Baby Bear
Part 7 - Sewing the actual book bags"
Blog 75 - Allowing the Fabric to Dictate Design - Make a Fire Engine-Shaped Scatter Cushion
"I recently landed myself in trouble when I made two heart-shaped scatter cushions for my two nieces. My youngest nephew would not be happy with not getting anything and a pink heart-shaped cushion certainly would not satisfy him either. I ransacked the fabric stash and came across a very cute printed cotton blend with a fire engine theme. I decided on the spot that I would make him a fire engine from this fabric. The idea here is to allow the print on the fabric to complete the story that you are merely starting in the shape. Allow for some initiative to fill in the gaps. This is good for their development. When I gave him the cushion he asked me where the hose was. I told him he would have to add his own and without any further prompt a game ensued that relied heavily on association and fantasy. I could not wish for anything better!"

Blog 76 - Adjusting an Existing Pattern to Sew a Pleated Baby Bag Part 1
"Ever since I was asked to make two baby bags by a client I kept thinking I would draw up a brand new pattern for the project. The problem was that the client had already indicated that she liked a particular style of bag and it was one that I had already designed a pattern for. The more I thought about it, the clearer it became that I should use the existing pattern and simply make a few adjustments to the pattern. The pattern is available for free from the store and you can download it here. There are a number of other patterns as well. After you've seen how I adjusted this pattern, you may want to do the same with one of the others?
Read Part 1 here.
Read Part 2 here."

Blog 77 - Adjusting an Existing Pattern to Sew a Pleated Baby Bag Part 2
"We started making a baby bag in the previous blog. Instead of drawing up a brand new pattern, I opted to show you how you could easily use an existing pattern with a minor adjustments. We have started sewing the bag together in the previous blog and will finish it in today's blog. The pattern is available for free from the store and you can download it here. There are a number of other patterns as well.
Read Part 1 here.
Read Part 2 here."

"I recently landed myself in trouble when I made two heart-shaped scatter cushions for my two nieces. My youngest nephew would not be happy with not getting anything and a pink heart-shaped cushion certainly would not satisfy him either. I ransacked the fabric stash and came across a very cute printed cotton blend with a fire engine theme. I decided on the spot that I would make him a fire engine from this fabric. The idea here is to allow the print on the fabric to complete the story that you are merely starting in the shape. Allow for some initiative to fill in the gaps. This is good for their development. When I gave him the cushion he asked me where the hose was. I told him he would have to add his own and without any further prompt a game ensued that relied heavily on association and fantasy. I could not wish for anything better!"
Blog 76 - Adjusting an Existing Pattern to Sew a Pleated Baby Bag Part 1
"Ever since I was asked to make two baby bags by a client I kept thinking I would draw up a brand new pattern for the project. The problem was that the client had already indicated that she liked a particular style of bag and it was one that I had already designed a pattern for. The more I thought about it, the clearer it became that I should use the existing pattern and simply make a few adjustments to the pattern. The pattern is available for free from the store and you can download it here. There are a number of other patterns as well. After you've seen how I adjusted this pattern, you may want to do the same with one of the others?
Read Part 1 here.
Read Part 2 here."
Blog 77 - Adjusting an Existing Pattern to Sew a Pleated Baby Bag Part 2
"We started making a baby bag in the previous blog. Instead of drawing up a brand new pattern, I opted to show you how you could easily use an existing pattern with a minor adjustments. We have started sewing the bag together in the previous blog and will finish it in today's blog. The pattern is available for free from the store and you can download it here. There are a number of other patterns as well.
Read Part 1 here.
Read Part 2 here."
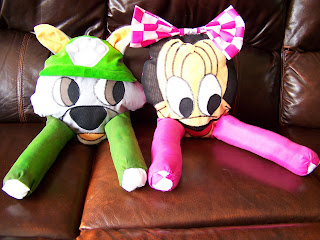
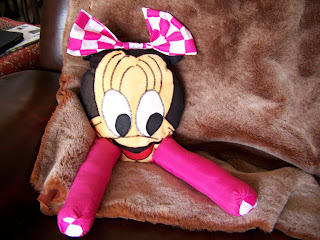
Blog 78 - Pattern Design: We design a pattern for a Minnie Mouse Cuddle Cushion Part 1
"I have written a series of three blogs before about two bear-shaped cuddle cushions I made on order. My nieces and nephew saw these and immediately demanded that I make them their own. The youngest niece is an ardent Minnie Mouse fan and it soon became apparent that I would have to make hers a Minnie Mouse Cuddle Cushion. This is slightly more intricate than the bears since I would be working with a loved and known character rather than a figment of my own imagination. For this reason I decided to draw up the pattern first instead of simply planning it straight on the fabric. If you are interested in pattern design then this blog is for you.
Easily navigate between the three parts of this blog series by clicking on the links provided:
Part 1
Part 2
Part 3"

Blog 79 - Pattern Design: We design a pattern for a Rocky (from Paw Patrol) Cuddle Cushion Part 1
"When asked to design Cuddle Cushions for my nieces and nephew, the little boy at first wanted a Buzz Lightyear. He soon changed his mind when I pointed out to him that it would mean that the pillow would basically be flesh-colored and purple. This was when he decided upon Rocky from Paw Patrol. This aunt had to go on a Google search but soon found what I was looking for with his input. In this blog I show you how to design the pattern for this cute puppy before we make it.
Easily navigate between the differents parts of this 3 part blog series by following the links:
Part 1
Part 2
Part 3"

Blog 80 - Fabric Layout & Prep: We make a Minnie Mouse Cuddle Cushion Part 2
"We have started with the design and pattern of a Minnie Mouse Cuddle Cushion in Part 1 of this series. In today's blog we will cut the pattern out of fabric, stiffen the necessary parts with vilene and start the preparatory sewing. Tomorrow we will applique the face and put the cushion together.
Blog 81 - Fabric Layout & Prep: We make a Rocky (from Paw Patrol) Cuddle Cushion Part 2
"We have started with the design and pattern of a Rocky (from Paw Patrol) Cuddle Cushion in Part 1 of this series. In today's blog we will cut the pattern out of fabric, stiffen the necessary parts with vilene and start the preparatory sewing. Tomorrow we will applique the face and put the cushion together.
Easily navigate between the different parts of this 3 part blog series by following the links:
Blog 82 - Applique & Construction: We make a Minnie Mouse Cuddle Cushion Part 3
"We have been working on the Minnie Mouse Cuddle Cushion for a while now and it is time to put the finishing touches to the cushion. In today's blog we will applique the face before we sew the different parts together and fill the cushion with stuffing.
Easily navigate between the three parts of this blog series by clicking on the links provided:
Blog 83 - Applique & Construction: We make a Rocky (from Paw Patrol) Cuddle Cushion Part 3
"I have been asked to turn the character of Rocky from the animation series Paw Patrol into a Cuddle Cushion and we have been working on this for two blogs already. Today we applique the face and put the different pieces together before filling the cushion with stuffing. Remember to post pictures of your own finished products.
Easily navigate between the differents parts of this 3 part blog series by following the links:
"I have written a series of three blogs before about two bear-shaped cuddle cushions I made on order. My nieces and nephew saw these and immediately demanded that I make them their own. The youngest niece is an ardent Minnie Mouse fan and it soon became apparent that I would have to make hers a Minnie Mouse Cuddle Cushion. This is slightly more intricate than the bears since I would be working with a loved and known character rather than a figment of my own imagination. For this reason I decided to draw up the pattern first instead of simply planning it straight on the fabric. If you are interested in pattern design then this blog is for you.
Easily navigate between the three parts of this blog series by clicking on the links provided:
Part 1
Part 2
Part 3"
Blog 79 - Pattern Design: We design a pattern for a Rocky (from Paw Patrol) Cuddle Cushion Part 1
"When asked to design Cuddle Cushions for my nieces and nephew, the little boy at first wanted a Buzz Lightyear. He soon changed his mind when I pointed out to him that it would mean that the pillow would basically be flesh-colored and purple. This was when he decided upon Rocky from Paw Patrol. This aunt had to go on a Google search but soon found what I was looking for with his input. In this blog I show you how to design the pattern for this cute puppy before we make it.
Easily navigate between the differents parts of this 3 part blog series by following the links:
Part 1
Part 2
Part 3"
Blog 80 - Fabric Layout & Prep: We make a Minnie Mouse Cuddle Cushion Part 2
"We have started with the design and pattern of a Minnie Mouse Cuddle Cushion in Part 1 of this series. In today's blog we will cut the pattern out of fabric, stiffen the necessary parts with vilene and start the preparatory sewing. Tomorrow we will applique the face and put the cushion together.
Easily navigate between the three parts of this blog series by clicking on the links provided:
Blog 81 - Fabric Layout & Prep: We make a Rocky (from Paw Patrol) Cuddle Cushion Part 2

"We have started with the design and pattern of a Rocky (from Paw Patrol) Cuddle Cushion in Part 1 of this series. In today's blog we will cut the pattern out of fabric, stiffen the necessary parts with vilene and start the preparatory sewing. Tomorrow we will applique the face and put the cushion together.
Easily navigate between the different parts of this 3 part blog series by following the links:
Blog 82 - Applique & Construction: We make a Minnie Mouse Cuddle Cushion Part 3
"We have been working on the Minnie Mouse Cuddle Cushion for a while now and it is time to put the finishing touches to the cushion. In today's blog we will applique the face before we sew the different parts together and fill the cushion with stuffing.
Easily navigate between the three parts of this blog series by clicking on the links provided:
Blog 83 - Applique & Construction: We make a Rocky (from Paw Patrol) Cuddle Cushion Part 3
"I have been asked to turn the character of Rocky from the animation series Paw Patrol into a Cuddle Cushion and we have been working on this for two blogs already. Today we applique the face and put the different pieces together before filling the cushion with stuffing. Remember to post pictures of your own finished products.
Easily navigate between the differents parts of this 3 part blog series by following the links:
Part 3"

For more crafty ideas and great products, visit APrettyTalent.com.
Remember to keep nurturing your TALENT for making PRETTY things.
You can subscribe to this blog and receive regular updates by email by simply registering your email address at the top of the current blog.
Blog 84 - Make a Rabbit Cuddle Cushion - Pattern Design Part 1
"I have been making Cuddle Cushions for a number of people and recently were asked to make a rabbit as well. I figured more of you might be interested in this one and this blog is as a result of that. Imagine how cute this would be over Easter! I have once again photographed the steps for you, but the sheer number of steps forces me to publish it over three blogs. In this first blog we will draw up the pattern.

Blog 85 - Make a Rabbit Cuddle Cushion - Layout & Prep Part 2
"In the previous blog we have started with the construction of yet another Cuddle Cushion, this time in the shape of a rabbit. We designed the pattern in the part 1 of the blog series and today we will continue with part 2. In this blog we will cut out the fabric and do the preparatory work before we start sewing in earnest in Part 3.

Blog 86 - Make a Rabbit Cuddle Cushion - Sewing & Construction Part 3
"We have been working on a Cuddle Cushion in the shape of a rabbit for the past two blogs and it is time we put the finishing touches on it. In part 1 of the blog series we designed the pattern. I part 2 we cut out the fabric and did some preparatory sewing and ironing. In this last blog we will do the appliqueing before constructing the rabbit and filling it with stuffing.

"I have been making Cuddle Cushions for a number of people and recently were asked to make a rabbit as well. I figured more of you might be interested in this one and this blog is as a result of that. Imagine how cute this would be over Easter! I have once again photographed the steps for you, but the sheer number of steps forces me to publish it over three blogs. In this first blog we will draw up the pattern.
Blog 85 - Make a Rabbit Cuddle Cushion - Layout & Prep Part 2
"In the previous blog we have started with the construction of yet another Cuddle Cushion, this time in the shape of a rabbit. We designed the pattern in the part 1 of the blog series and today we will continue with part 2. In this blog we will cut out the fabric and do the preparatory work before we start sewing in earnest in Part 3.
Blog 86 - Make a Rabbit Cuddle Cushion - Sewing & Construction Part 3
"We have been working on a Cuddle Cushion in the shape of a rabbit for the past two blogs and it is time we put the finishing touches on it. In part 1 of the blog series we designed the pattern. I part 2 we cut out the fabric and did some preparatory sewing and ironing. In this last blog we will do the appliqueing before constructing the rabbit and filling it with stuffing.
Blog 87 - Painting Cute Cows on Fabric
"I've had a request by someone to design some cows for a farm themed kitchen they were decorating. A couple of blogs ago I showed you how to draw two cute cows step by step. I transferred these drawings onto fabric before painting them in some mad bright colors. Let me show you how to make your own version of this in today's blog."

"I've had a request by someone to design some cows for a farm themed kitchen they were decorating. A couple of blogs ago I showed you how to draw two cute cows step by step. I transferred these drawings onto fabric before painting them in some mad bright colors. Let me show you how to make your own version of this in today's blog."
Blog 88 - Flower Pots Fabric Painting Part 1 of 2
"I use the three designs for the sets of lopsided flower pots in today's blog. I show you how to use a projector to enlarge the designs. I then transfer the designs to fabric and give you one of many ideas for painting the designs. In the next blog I will paint the last of the three designs before turning the trio into a practical and decorative item for the home."


Blog 89 - Flower Pots Fabric Painting Part 2 of 2
"Who does not like a pretty table to wine and dine friends and family at? Today we will be making a pretty runner from the Lopsided Flower Pot Trio Designs that we have painted on fabric, to decorate your table with. In the previous blog we have used a projector to enlarge the images so we could trace them onto fabric. We then painted the first two designs and it is now time to paint the last of the three. Afterwards, we will turn the set of three into a table runner and I will show you step by step how to do this effortlessly."


"I use the three designs for the sets of lopsided flower pots in today's blog. I show you how to use a projector to enlarge the designs. I then transfer the designs to fabric and give you one of many ideas for painting the designs. In the next blog I will paint the last of the three designs before turning the trio into a practical and decorative item for the home."
Blog 89 - Flower Pots Fabric Painting Part 2 of 2
"Who does not like a pretty table to wine and dine friends and family at? Today we will be making a pretty runner from the Lopsided Flower Pot Trio Designs that we have painted on fabric, to decorate your table with. In the previous blog we have used a projector to enlarge the images so we could trace them onto fabric. We then painted the first two designs and it is now time to paint the last of the three. Afterwards, we will turn the set of three into a table runner and I will show you step by step how to do this effortlessly."
Blog 90 - Sewing a Cute Cow Table Protector
"Not too long ago I posted a blog where I showed you how to paint some cute cows.The designs for the Cute Cows are available for download in digital format from APrettyTalent.com. In today's blog I take this painting and turn it into a practical, but pretty, item for the home when I sew a table protector. A table protector is almost like a pot stand as it is padded and can withstand heat. It is however, not intended to withstand extreme heat, and it is much larger. This makes it the ideal item to place on the table when you have lukewarm dishes. Scalding hot ones can rather go on the buffet."

"Not too long ago I posted a blog where I showed you how to paint some cute cows.The designs for the Cute Cows are available for download in digital format from APrettyTalent.com. In today's blog I take this painting and turn it into a practical, but pretty, item for the home when I sew a table protector. A table protector is almost like a pot stand as it is padded and can withstand heat. It is however, not intended to withstand extreme heat, and it is much larger. This makes it the ideal item to place on the table when you have lukewarm dishes. Scalding hot ones can rather go on the buffet."
Blog 91 - Painting a Fish Tails Tablecloth
"I love the swanky fish that are available in the Fishy Four collection on APrettyTalent.com. Ever since drawing the designs I have known that I would like to enlarge them and paint them on a table cloth that I would like to use at a beach house, or on holiday somewhere on the coast, or possibly simply at the pool for a pool party. Let me show you how I used two of the designs in the collection to paint a vibrant and happy scene for a table setting."

"I love the swanky fish that are available in the Fishy Four collection on APrettyTalent.com. Ever since drawing the designs I have known that I would like to enlarge them and paint them on a table cloth that I would like to use at a beach house, or on holiday somewhere on the coast, or possibly simply at the pool for a pool party. Let me show you how I used two of the designs in the collection to paint a vibrant and happy scene for a table setting."
Blog 92 - Adapting an Existing Pattern to Your Own Style
"How often have you wanted to sew something you envisioned in your own head, but then you simply could not find the exact pattern for it? It is costly to find a pattern designer to draw the pattern of your vision and often you compromise to make something that is like your vision without realizing the ideal you had in mind. This can for the most part be avoided if you know how to adapt an existing pattern to turn it into the vision of your dreams. I show you what to look out for when I adapt a boy's fishing jacket to become a girl's bolero in today's blog."

"How often have you wanted to sew something you envisioned in your own head, but then you simply could not find the exact pattern for it? It is costly to find a pattern designer to draw the pattern of your vision and often you compromise to make something that is like your vision without realizing the ideal you had in mind. This can for the most part be avoided if you know how to adapt an existing pattern to turn it into the vision of your dreams. I show you what to look out for when I adapt a boy's fishing jacket to become a girl's bolero in today's blog."
Blog 93 - Sewing a Double-Sided Bolero
"In today's blog I will show you step by step how to sew a pretty little double-sided bolero, perfect for those special occasions where you just need a little something to cover the shoulders with. This pattern is so easy that you can manage it in little more than an hour, including the sewing by hand!"

"In today's blog I will show you step by step how to sew a pretty little double-sided bolero, perfect for those special occasions where you just need a little something to cover the shoulders with. This pattern is so easy that you can manage it in little more than an hour, including the sewing by hand!"
Blog 94 - Making PJ's a Boy won't wear to Bed!
"My little nephew arrived for a sleepover the other day and I became very excited by the idea of me making sleepwear for myself. I then promised him that I would make him some as well. The next day I had some time on my hands and a little boy conveniently close by for measuring and fitting, so I set about making him a pair of trousers and a shirt to sleep in. He was very impressed! Only problem is that he refuses to sleep in it, calling it his fireman's outfit and wearing it as day clothes. Well, it's his outfit after all, so who is to say he may not do so? Certainly not this aunt! Let me show you how easy it is to sew this outfit in just about two hours."

Blog 95 - Sewing a Summer Dress for a Little Girl
"After making an outfit for my little nephew, my niece would not be satisfied until she had a new outfit as well. She loves wearing dresses and she is crazy about all things pink. Fortunately I had some fabric left over from a previous project. I quickly cut a her a dress from an old pattern I found among my mom's things and started on her dress. It was ready for her to wear home before she and her brother left later in the day. Let me walk you through this cute idea."

"My little nephew arrived for a sleepover the other day and I became very excited by the idea of me making sleepwear for myself. I then promised him that I would make him some as well. The next day I had some time on my hands and a little boy conveniently close by for measuring and fitting, so I set about making him a pair of trousers and a shirt to sleep in. He was very impressed! Only problem is that he refuses to sleep in it, calling it his fireman's outfit and wearing it as day clothes. Well, it's his outfit after all, so who is to say he may not do so? Certainly not this aunt! Let me show you how easy it is to sew this outfit in just about two hours."
Blog 95 - Sewing a Summer Dress for a Little Girl
"After making an outfit for my little nephew, my niece would not be satisfied until she had a new outfit as well. She loves wearing dresses and she is crazy about all things pink. Fortunately I had some fabric left over from a previous project. I quickly cut a her a dress from an old pattern I found among my mom's things and started on her dress. It was ready for her to wear home before she and her brother left later in the day. Let me walk you through this cute idea."
Blog 96 - Covering Boxes with fabric to Create Cute Storage Boxes
"The hot Summer months are with us and with it came an increase in ice cream sales. My family joined in this and pretty soon there were three of these ice cream boxes floating around the house. I liked the shape of them and decided to keep them for a future project. Initially I figured I would cover them with paper, or paint them, or something. Then I figured it would be great fun to cover them with fabric and to use them as storage boxes to help organize a room, or my work area, or somewhere useful. I could even gift them as Christmas presents! Very versatile indeed. Let me walk you through these quick and easy steps. It took me less than two hours to make all three boxes."

Blog 97 - Designing and Sewing a Dress Inspired by Elsa from Frozen
"If you have a little girl in your life, you will be able to testify to the popularity of the character called Elsa in the movie Frozen. My (almost) four year old niece and my nine year old niece alike have begged me to make them dresses like Elsa's. I figured it would make the perfect gift for Christmas and paid a visit to the local fabric store. I show you how to design the pattern as well as how to make the dress in today's blog."

Blog 98 - Designing and Sewing a Dress Inspired by Elsa from Frozen Take 2
"In the previous blog I shared the steps for designing and making a dress similar to Elsa's from Frozen. This was for my nine year old niece. However, I still needed to make an 'Elsa Dress' for my four year old niece as well. The dresses had to be similar enough to satisfy the younger niece, but different enough so the older niece was satisfied that the younger wasn't copying her. I wanted to make the train removable for the younger niece, change the neckline and sleeves as well as to cut out the use of the stretch netting, which was too sheer (and scratchy) for a younger child. In the end it was a completely different dress, but still close enough to resemble the original dress worn by Elsa. Both nieces satisfied. Let me show you how to make this version."

"The hot Summer months are with us and with it came an increase in ice cream sales. My family joined in this and pretty soon there were three of these ice cream boxes floating around the house. I liked the shape of them and decided to keep them for a future project. Initially I figured I would cover them with paper, or paint them, or something. Then I figured it would be great fun to cover them with fabric and to use them as storage boxes to help organize a room, or my work area, or somewhere useful. I could even gift them as Christmas presents! Very versatile indeed. Let me walk you through these quick and easy steps. It took me less than two hours to make all three boxes."
Blog 97 - Designing and Sewing a Dress Inspired by Elsa from Frozen
"If you have a little girl in your life, you will be able to testify to the popularity of the character called Elsa in the movie Frozen. My (almost) four year old niece and my nine year old niece alike have begged me to make them dresses like Elsa's. I figured it would make the perfect gift for Christmas and paid a visit to the local fabric store. I show you how to design the pattern as well as how to make the dress in today's blog."
Blog 98 - Designing and Sewing a Dress Inspired by Elsa from Frozen Take 2
"In the previous blog I shared the steps for designing and making a dress similar to Elsa's from Frozen. This was for my nine year old niece. However, I still needed to make an 'Elsa Dress' for my four year old niece as well. The dresses had to be similar enough to satisfy the younger niece, but different enough so the older niece was satisfied that the younger wasn't copying her. I wanted to make the train removable for the younger niece, change the neckline and sleeves as well as to cut out the use of the stretch netting, which was too sheer (and scratchy) for a younger child. In the end it was a completely different dress, but still close enough to resemble the original dress worn by Elsa. Both nieces satisfied. Let me show you how to make this version."
Blog 99 - Sewing a Girly Top from Offcuts
"I had cut a skirt for my niece and was left with all kinds of funny shapes in the leftover fabric. It seemed too small to cut a pattern piece from and was on its way to the offcut bag that I collect for a local preschool, when it occurred to me that I could put together different offcuts to cut this cute girly top. I show you how in today's blog."

Blog 100 - Sewing a Skirt to Match Your Girly Top
"I showed you how I made a top from offcut fabric in the previous blog, but I never showed you how I made the original skirt that resulted in the off-cut fabrics. The need arose when I made a full flair dress for one niece and the other got to see it. She had better manners than to say anything, but I could see that she longed to have one just like it. Which little girl would not? I released her on my fabric stash, and with certain prohibitions, allowed her to select the fabric combination she liked best. She settled on a glittering orange combo. Initially, I thought I would help her to make her own skirt, but the fabric would be a little challenging for a nine year old sewing for the first time. I decided it would be best if I made this one and she sewed something made from cotton. This skirt seems more intricate to make than it really is. Let me walk you through the steps and then you can make one for the girls in your life."

"I had cut a skirt for my niece and was left with all kinds of funny shapes in the leftover fabric. It seemed too small to cut a pattern piece from and was on its way to the offcut bag that I collect for a local preschool, when it occurred to me that I could put together different offcuts to cut this cute girly top. I show you how in today's blog."
Blog 100 - Sewing a Skirt to Match Your Girly Top
"I showed you how I made a top from offcut fabric in the previous blog, but I never showed you how I made the original skirt that resulted in the off-cut fabrics. The need arose when I made a full flair dress for one niece and the other got to see it. She had better manners than to say anything, but I could see that she longed to have one just like it. Which little girl would not? I released her on my fabric stash, and with certain prohibitions, allowed her to select the fabric combination she liked best. She settled on a glittering orange combo. Initially, I thought I would help her to make her own skirt, but the fabric would be a little challenging for a nine year old sewing for the first time. I decided it would be best if I made this one and she sewed something made from cotton. This skirt seems more intricate to make than it really is. Let me walk you through the steps and then you can make one for the girls in your life."
For more crafty ideas and great products, visit APrettyTalent.com.
Remember to keep nurturing your TALENT for making PRETTY things.
You can subscribe to this blog and receive regular updates by email by simply registering your email address at the top of the current blog.
No comments:
Post a Comment